My antique radio restoration logs
Here is the process I used to replace the pot metal shafts in my Zenith 3R radio. All were frozen due to swelling of the pot metal inside the brass panel bushings.
First, the existing shaft was broken off at the panel bushing by inserting a thin screwdriver between the pointer and panel bushing. The objective was not to damage the pointer.
The pointer was left secured to the knob through the following steps.
The protruding pot metal was smoothed off from the bushing and the knob using a Dremel tool with various milling tools. The objective here is to provide a flat surface for the following step.
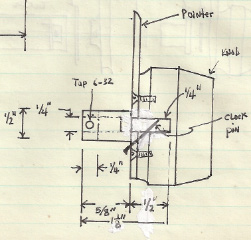
The remnants of the shaft was drilled out of the bushing and the knob using successively larger drill bits, starting with 1/16" and working up to 1/4". One must be careful that the initial drill is exactly centered. Any remaining pot metal material was then removed from the bushing using an Exacto knife, screwdriver, etc. For the knobs, the 1/4" hole depth used was 3/16" past the pointer casting into the knob.
A 1/4" steel shaft was inserted into the knob.
A hole for a securing pin was drilled into the knob and pointer using a #65 drill. I started the hole about 1/8" from the shaft and angled in at about 30 degrees. I drilled through the pointer casting, knobs, and steel shaft until I hit plastic again.
I then selected and fit a tapered clock pin that would reach through the shaft and fit tightly.
I then removed the pin and shaft, removed the screws holding the pointer to the knob, and cleaned the pointer and knob using GoJo and steel wool, toothbrushes, etc.
I then reassembled the knob and pointer, inserted the shaft with the correct orientation, inserted the clock pin, and drove it home with a punch. If I recall correctly, I cut off a small portion of the thin end of the pin in order to ensure a tight press fit in the shaft.
Any part of the clock pin that was exposed was then removed using a Dremel cut-off disc.
The result is an invisible repair once the knob is installed.
The steel shaft was then cut to length and remaining components installed.
Here is a sketch of the processing for the TUNING knob (before cutting off the excess pin)..
