Zenith 6D612 (6-D-612) Restoration
|
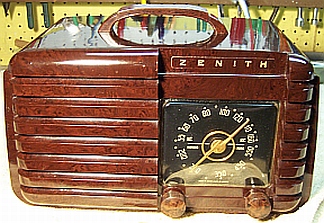
The Zenith 6D612 from 1942 is a
6-tube AC/DC Superhet with a tuned RF amplifier stage and Wavemagnet
loop antenna. It only receives the Broadcast band. The cabinet
is mottled brown bakelite. There is also a white version (6D612W) - I
assume painted. The schematic for the 6D612 can be found on-line at Nostalgia
Air. Any references to part numbers refer to that schematic.
The radio had seen minimal servicing in the past. I decided to try to
reverse all previous servicing to the extent possible, yet get it working. |
My
antique radio restoration logs
Condition As Found
This radio was purchased on eBay. The cabinet and knobs were
in excellent condition. The power cord had deteriorated, and the radio sold as not
tested. The often missing back
cover was present.
Previous Repairs
-
All but two tubes were likely the original Zenith brand with date
code 14 consistent with a 1941 manufacturing date. They did not have an
"R" suffix and thus were OEM and not Zenith replacements.
-
The 35Z5 and 12SA7 tubes
likely had been replaced, since they were not Zenith. All tubes were GT
type, even though the schematic called for G type tubes for the 35L6 and
12J7. But since these two tubes were both GT types and likely original, I
assumed that the change to GT types was a production change or a change
forced by pre-war parts availability.
-
Three wax/paper capacitors had been replaced with two disc
ceramic capacitors and one orange drop capacitor. C6 (22-1049, 0.03mfd 400
volts) had been replaced with a .01mfd (disc). The original filter
capacitor was still in place.
-
All of the original wiring and resistors were still in place.
Survey
My usual restoration procedure is to first make a complete
survey of the condition of all components. The survey results guide my
restoration strategy. I never apply power to a radio before
restoration, even through a "dim bulb tester" or variac "to see
if it works". If major and unique components are defective or
missing and
cannot be restored or replaced, I may elect to sell the radio for parts rather than
to restore it.
I always assume that all paper and electrolytic capacitors are leaky and thus should be
replaced (I always "restuff" the original containers if possible).
Any mica capacitors are assumed OK until testing proves otherwise.
-
The AC power switch was OK.
-
The original rubber AC power cord and plug had badly deteriorated and would
have to be replaced.
-
The speaker cone and field coil were OK..
-
The output transformer was OK.
-
All RF coils and the IF transformers were OK.
-
The pilot lamp was OK.
-
All the tubes except the 12SQ7GT tested good. The 12SQ7GT tested weak,
but would likely work in the radio.
-
Seven resistors were out of tolerance by more than 20%. One measured
completely open (one of two 15 meg resistors used). All resistors were 1/2 watt carbon
composition types.
Repairs
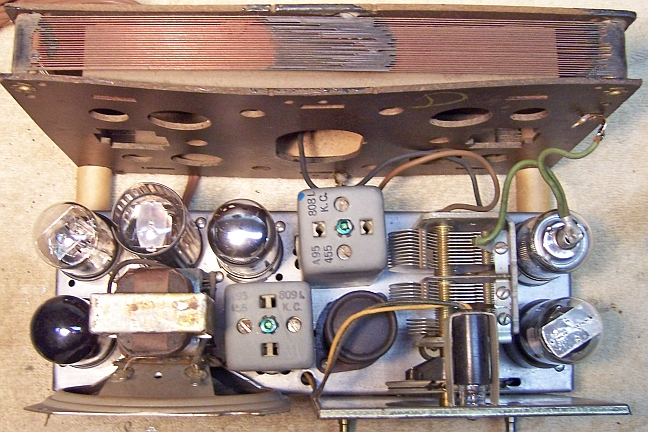
Before starting repairs I made BEFORE photos of the chassis top and bottom. I use these photos to ensure that replacement parts and
wiring are placed as close as possible to their original positions. Some
radios are subject to problems (such as hum pickup or oscillation) if wiring is re-routed or
lead dress is not the same as the original.
In Zenith schematics, all resistors and capacitors having the same
value have the same part number call out. So for example, there may be
multiple R2's or C4's on the schematic. Before I start work on the chassis
I annotate the schematic and under chassis photo so that all parts have unique
identifiers. I usually add an alphabetic suffix, so that the part numbers
are thus R1A, R1B, etc. I then annotate the chassis photo with these unique part
numbers with a red felt-tip pen.
It was discovered during
my component survey that my radio did not match the published schematic found in
Riders:
- As previously mentioned, all tubes (even the likely original Zenith tubes)
were GT types. On the schematic, the 12J7, 12SA7, 35Z5 and 35L6 are G types.
- R1 was 22K vs. the 15K published value. In addition, this resistor was
found connected between B+ and the cold (lower) end of the transformer 2 primary
winding rather than
between the 12J7 plate lead and primary of transformer 2.
- A 2.2K resistor was found connected between the secondary tap on
transformer 2 and the grid of the 12SA7. The changes around RF transformer 2
were likely production changes that were not documented due to the pressure
to get radios out the door before the changeover to war production in
1943. The radio was restored to as-found condition vs. the
schematic.
All tubes were removed. The chassis was very clean, with no rust - just
very dusty. It was first cleaned off with an air compressor. The chassis
was then cleaned with a tooth brush and vacuum cleaner to remove any remaining
dust.
The AC line cord was replaced with a new vinyl cord. I was able to make all
repairs without disturbing any of the rubber covered wiring, which would have
meant replacement of the wires.
Capacitors
The original power supply filter capacitor C7-C8 was removed and restuffed.
It was a 20+20mfd @ 150 volt FP twist lock type capacitor. It was restuffed using two
22mfd 160 volt axial capacitors. My
procedure for restuffing FP type can capacitors is as follows (there are many
discussions and examples with photos on Antique
Radio Forums):
- Remove the cardboard cover. In this case, it pulled off without
difficulty. Sometimes I must use a heat gun to soften the tar
holding it to the can.
- Uncrimp the bottom using diagonal cutters (try to
minimize damage to the outside of the can)
- Remove the mounting ring, the outer terminal board, the almost liquid
gasket material behind, and a second fiber board, cutting the aluminum leads to the capacitor body to free up the terminal
boards.
- Remove the can contents using a heat gun to release the tar, followed by a
thorough cleaning using mineral spirits. In this case, the foil roll
could be removed without heating, and the remaining tar removed by
mechanical means.
- Remove the sealer/gasket material between the two terminal board layers
using a small screwdriver and an Exacto knife. Clean off any remaining
material using lacquer thinner. Both sides of the two terminal boards
must be very clean, since they will be glued together using epoxy. The
two terminals are secured between the two boards.
- After the epoxy hardens, connect the replacement capacitor leads to the original terminals by
drilling small holes through the terminal boards close to the terminals,
passing the leads through, and soldering them to the terminals on the
outside.
- The common ground lead is passed through a small hole drilled near
one of the capacitor ground/mounting tabs. The hole is located by
temporarily replacing the mounting ring (there is a tab that fits into a
notch on the outer terminal board) and marking the location near one of the
three mounting twist tabs. This lead is not soldered
to the ground lug until after the capacitor is secured in the chassis
mounting wafer (otherwise the solder would prevent the lug easily passing
through the hole in the mounting wafer or could damage the wafer - ASK ME
HOW I KNOW THAT).
- Reinstall the terminal boards with attached replacement capacitors and the
mounting ring and restore the crimp
around the base. I start the crimp using a screwdriver and then
flatten it out using a plastic tipped hammer.
- Reinstall the cardboard cover (it was not glued - just held by friction).
The cover hides any signs of the bottom crimp being disturbed. Be
aware that the capacitor body is electrically HOT (connected to one side of
the AC line), so the cover is an important safety
feature. The chassis itself is isolated from the AC line by a
capacitor.

Terminal boards being attached using epoxy.
|

Replacement capacitor leads passed through the terminal boards and
soldered to the terminals on the outside.
|

Three original Zenith wax/paper capacitors had been replaced in servicing.
Two were part 22-243 (0.01mfd/400 volts) and one was a 22-1049 (0.03mfd/400
volts). I maintain a stock of branded (Zenith, Philco etc.) as well as generic
(Sprague, CD etc.) dud capacitors just for this situation. I was able to find
two Zenith 22-243C capacitors in my dud stock. For the 0.03mfd, I did not
have an original Zenith 22-1049, but did have a Zenith 22-836E (0.03mfd/400 volt,
same value and voltage) in stock. All of the original Zenith paper capacitors as well as the Zenith duds
were rebuilt in their original cases
using modern 630 volt film capacitors in order to maintain the original
under-chassis appearance. My re-stuffing process is documented here.
One capacitor, C5 was a challenge. It was a 500pf 600 volt
capacitor. There was not enough room in the original case for a silver
mica or ceramic disc capacitor rated at 600 volts. So I used two 0.001mfd
630 volt capacitors in series. There was just enough room for two
capacitors placed end to end (but only if a certain brand of capacitor was used
- some commonly available film capacitors are too large for this
application). 500pf/630 volt axial capacitors are now available from http://www.justradios.com/capacitors.html
in Canada. I will be using these type capacitors for future restuffing of this
particular capacitor which is common in Zeniths.

Cabinet
The cabinet was cleaned using GoJo (White) hand cleaner, applied and then
wiped clean using Toolbox White Rags (soft, smooth paper towels). A coat of
Johnsons wax was then applied.
Testing and Alignment
Once the radio chassis was reassembled and the tubes installed, power was brought up
slowly using a variac. A DVM monitored the B+. The radio came to life immediately and worked
well.
Restoration Results
Chassis Bottom Before and After Restoration


Restoration Completed Photos